As my most recently-completed project is being quilted by my new best friend -- a local long arm quilter -- I find myself toying with ideas for another quilt. Oh, that doesn't mean that I don't have other quilts in progress or in planning. But my problem is that the more experience and practice I get quilting and sewing, the more challenging and creative projects I want to try. Today, I received an email about an embroidery contest from Sublime Stitching. The contest didn't really interest me, but as I was looking around at the patterns, an idea for a really cool quilt came to mind. My next project for myself will be a quilt that will be decorated with hand-embroidered pin-up girls on solid white blocks. Come on, that will be great, huh? I really like the old-school pin-ups, and the embroidery patterns that I have include space girls, cow girls, and old fashioned pin-up girls like you see in vintage posters and magazines. They are all modest, while still being edgy and fun. I will have to choose fabrics, and then maybe find a way to coordinate the embroidery floss colors to the fabrics, but that should be fairly easy. I think it will be a fun project, and at least in the case of the hand embroidery work, it will be something that I can carry around with me and work on even when I'm not sitting in front of my sewing machine.
So that's all for now. Just wanted to get that idea out there. I should jot it down in my craft journal, but this one was too good not to share. And who knows, maybe I'll get lucky and get a REAL embroidery machine for my 10th Wedding Anniversary / Birthday / Christmas later this year. But then again, the machine embroidery wouldn't really give my quilt the same feeling, so no use drooling over an embroidery machine quite yet. I still like the look of the hand work.
Showing posts with label Craftiness. Show all posts
Showing posts with label Craftiness. Show all posts
July 16, 2010
July 13, 2010
Hooray!
I know, it's a lot different than the title from my last post. Not only did I finish hand-stitching all of those origami stars, but I also finished the quilt top AND the backing. My Sweet Honey Hubby is en route as I type to deliver my quilt to my newly-found long arm quilter friend. Seriously, this lady is a trip, and I was so incredibly glad to find someone locally who would not only take my quilting work, but would also be another source of encouragement and guidance as I continue to learn and improve and try new things.
This quilt will be a birthday present for my niece, Mamie. I really should have taken a picture of the quilt top to post, but the lighting was horrible yesterday (storms all day) and then today I was in a hurry to get the quilt on over to the LAQ. So, no pictures yet. I'll definitely post one of the finished quilt. Maybe one before I put on the binding, but definitely after it's all completed.
Next up in the parade of quilts will be to sew my Shoo-Fly rows into the finished quilt top. I'm still not completely set on a border, or what kind, for it, but I talked to the LAQ today in the shop and she does pantograph quilting, so I'm even more excited to get this one finished up and quilted. I want either a butterfly motif or bumble-bees for this one. Julie may have another suggestion, which would be great too. It's so cool to find someone who can share their opinion and help guide me. I am so new to all of this that I don't really know what questions to ask or what to try or what works and doesn't work, but she was really great with me today, talking through lots of ideas.
Then I have Gunnar's I-Spy quilt, which is ready, other than the border, so I'll probably take that one and the Shoo-Fly to her at the same time.
After that, I have a baby quilt to make for one of the make-up women that has befriended Erick when he is on set. I already have the fabric for the top, and the pattern that I plan on using goes on sale in two days, so I'll be ready to get started on that one by the end of the week.
It's funny to think how much I've already learned. Even more amazing is to think that only four months ago, I didn't even know how to thread a machine. The quilting/sewing bug has definitely gotten hold of me. It's so thrilling to start with fabric from a huge bolt and see it become something beautiful under my hands. I have the same feeling when I'm knitting, except I still knit WAY slower than I can already sew. Obviously, that is probably always the case, but I get to see things taking shape almost immediately when I am sewing. I really enjoy the process, but I definitely get a kick out of seeing the thing through to the end.
That's it for now. I'll update with a picture when Mamie's quilt is finished.
July 8, 2010
Aargh
For the record, hand sewing is NOT my talent-gift. Ugh. Aargh. Ick. Harumph.
I am working on a quilt for my niece's birthday, which was actually a couple of weeks ago. The quilt pattern looked deceptively simple. What I thought would be the hard part was the origami style folded stars on half of the blocks. Well, that went incredibly smoothly, but now I am at the point of hand-tacking the star shapes to their blocks so that they stay folded, and I am just beginning to get the hang of it. My first block looks fine out the outside, which is good, but the back side looks like a drunk woman did the sewing. Each block is getting easier, however, and I guess by the time I finish all ten star blocks, I might actually have a feel for what I'm doing. Ha! The tricky part is two-fold. One, the stitches actually have to be positioned so that they hold the stars in place. I mean, it's no good making a cool origami quilt, only to have the stars come unfolded at the first washing. Second, the stitches all have to be hidden. It's equally crummy to make a cool origami quilt and be able to see tacky stitches running around on the outside of the blocks. So it's just slow going for me -- one who is definitely NOT a seasoned hand-stitcher.
Never fear, I'll get there eventually. The quilt construction is not complicated at all, and I've done all the rest of the cutting, so it should come together quickly... once the star blocks are all tacked down. Ugh.
And here is a weird question. How come I loved the hand-stitched binding that I did on my first quilt, but the hand sewing for these stars is such a pain in the butt? Seriously, it makes no sense at all.
Back to it... ugh.
May 19, 2010
Here's the Photographic Evidence
As promised, here are some photos of my recent craftiness.


Homemade Bread

Mother's Day Tablerunners...
Mom's is already on her table. MIL's is on its way to her.
Mom's from Moda's Hunky Dorey

It really is a beautiful addition to her table.


Kathleen's is Moda's Make Life...

The Circle Quilt is trimmed and ready to bind. Update: I have to make 260 inches of binding!!!


Herbs, berries, okra, and jalapenos. All with signs.
And check out the tea cup bird feeder in the left background.


Vintage teacup birdfeeder.


Another one for the front yard. This one is my favorite.


Set of bags.

Business Card Holder (inside view)


Here are the links for these projects.
Circle Quilt (with modifications)
Plant Tags (with modifications)
Business Card Holder to hold my Mommy cards. (I added velcro to mine.)
That's about it. Oh, my I-Spy charms came today. Hopefully, I can get over to the quilt shop tomorrow and get some feedback on the pattern for Gunnar's quilt. I think I've marked off the idea of doing anything that involves more prints other than my large I-Spy blocks, but that still leaves me with a couple of options for the layout. I'm really leaning towards a random disappearing nine-patch pattern, but thinking that the only prints I'll use will be my I-Spy charms in the corners and maybe two different colors of solids for the small square and rectangle parts that get cut from the inside squares.
Hope you enjoyed the pictures. It has been a lot of fun working on these projects.
What On Earth Have I Been Doing?
Sewing... gardening... browsing around on Etsy... crafting... it's been a very productive time. I've been trying to keep everything organized in my mind, and finally had to force myself to put down my craft journal last night because I kept thinking of more things I needed to jot down before going to sleep.
One problem. Erick is asleep in the same room as my camera, so there won't be any pictures of my progress until tomorrow. But here is a run-down of the projects:
vintage teacup bird feeders
two quilted table runners for Mother's Day (one for my Mom and one for Erick's Mom)
completed the quilting and trimming for my circle quilt
weekender tote bag (Okay, so I still have a tiny bit of work left on this one.)
pencil pouch to match the tote bag
pleated little zipper bag to match the tote bag
business card holder to match the tote bag (holds my Mommy cards)
painted plant signs to label all the herbs, berries, and veggies that I've planted
cut out fabrics for quilted placemats and cloth napkins to match my patio dishes
Wow. Now that I see it all written out, I actually HAVE accomplished quite a bit. There is a slight hitch with the cloth napkin fabric. It appears to have the absorbency capacity of a slab of stainless steel. What I'm saying is that this fabric sucks if you're planning on using it to wipe up any sort of liquid at all. Oh well. At least now I know what sort of print will look good with my dishes and placemats. I'll save it and use it for something down the road. But this means that I've got to find new fabric for the napkins. At least I hadn't started sewing them. That would have been really crummy. My Mom showed me how different napkins that she has are better or worse for napkins, but I felt like mine was going to work. Again, I'm glad I gave it an official absorption test before getting them to the sewing machine.
My next projects (meaning things I've already purchased) will be to finish the placemats (and hopefully some decent napkins) and then I want to make an I-Spy quilt for Gunnar. Rather than dedicating my life to amassing the necessary fussy cuts on my own, I went on Etsy and bought two sets of I-Spy charms. My plan is to use a disappearing nine-patch pattern for the quilt, but I'm still sort of stuck on how I'll arrange the blocks. One quilt that I saw arranged the blocks so that the cut squares looked like sashing, which was really pretty, but I love the idea of arranging the blocks so that no two seams ever meet. It gives the quilt a much more abstract feel, which is nice for an I-Spy quilt. Guess I'll cross that bridge when I get there.
I bought a pattern to make a lunchbox for Evelyn to take to Art Camp, so I'll have to get that put together in the next few weeks. Then there is a little purse-sized organizer/binder that I want to make for myself, to match the Weekender Tote Bag.
The Circle Quilt has been quilted and trimmed, so I need to measure it, make the binding, sew on the binding, and then I'll hand-stitch the back side binding. That will finish up my very first quilt. It was good that I had the chance to make the tablerunners, because it gave me some really good practice with binding. I had planned on using pre-made binding for the quilt, but found that I actually enjoyed the process of making my own for the tablerunners, and my hand stitching isn't nearly as horrible as I expected it to be, so I think I'm gonna go for it.
Okay, that's all for tonight. Oh. Wait. I forgot one other Etsy purchase. I bought a fat quarter pack of Barbara Jones' Simply Sweet. Oh my how cute. I think I'm going to use it to make a picnic quilt. The backing will either be laminated cotton or oilcloth, so that it will be waterproof. I want to do a little more research on that before buying the fabric, but I'm thinking it should be a really cute vintage red-check pattern. That would be perfect with the Simply Sweet line.
More tomorrow, including pictures...
April 21, 2010
What I really needed was a sew-along
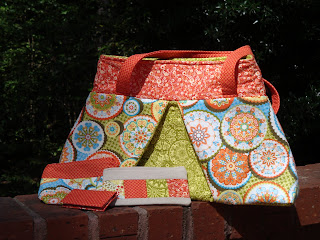
I found a really cute tote bag pattern in a sewing magazine a couple of weeks ago, but the more I read and re-read the pattern, the less sense it made to me. I kept thinking how much better it would be if I could find an online tutorial that showed all the steps along the way, complete with pictures of each step. Low and behold, the Sew Spoiled Sew-Along. Now I can follow along and make this great tote bag. Wanna see the fabric I chose for it? This was another purchase from the Couture Sewing Center earlier today.

The lighting wasn't absolutely great when I took this photo, so the colors are a little wonky. The two fabrics that look red are actually orange, but otherwise this is a pretty good representation of the prints. The big circle print will be the main outside fabric for the bag. The two orange prints will be the top border and handles. The green circle print on the left will be the inner part of the pleat and lining, and the small dot fabric will be one of the inner pockets. I will post pictures once I get started on the bag, but for the Sew Along, the current assignment was to choose and procure the fabrics, so this puts me right on schedule.
Okay, now it's definitely time to go to bed. No thanks to Katie's recommendation that I get the first season of White Collar to watch. I just finished Episodes 2 and 3. You are horrible to rope me into something like this. The only time I can watch is late at night and since the kids are asleep and the hubby is out of town, I figured I would splurge and watch two. I'm NOT going to watch another episode tonight. I'm NOT going to do it. Seriously. Not. Gonna. Happen.
April 20, 2010
My Very First Quilt Top
Drum roll, please. Here is the circle quilt top. It turned out pretty well, even if I do say so myself. Here is the picture, then I'll finish the story...


It's fine, right? Just ignore the little pieces of masking tape. Those are the row and column labels that I used to keep my blocks in order. Guess I could take those off now, huh?
I was so proud of it that I took it into the quilt shop to share my progress. But here's the thing. While I was in the shop looking at fabric for some future projects, one of the owners gave me some invaluable advice. She suggested that a border would really add some pizzaz to my quilt. She explained that the border is like the matte in a framed portrait. The binding is the frame, but you need something to separate the frame from the subject, or the quilt from the binding. Enter a border. Seriously, enter a border and see what happens. It's incredible.
I was so proud of it that I took it into the quilt shop to share my progress. But here's the thing. While I was in the shop looking at fabric for some future projects, one of the owners gave me some invaluable advice. She suggested that a border would really add some pizzaz to my quilt. She explained that the border is like the matte in a framed portrait. The binding is the frame, but you need something to separate the frame from the subject, or the quilt from the binding. Enter a border. Seriously, enter a border and see what happens. It's incredible.

Here's another shot.

Can you believe the difference? This just makes the quilt top look finished. Here is a close-up of the corner to show the detail in the border print.

Next, I will add a white second border, to outline the print border, and then the binding is solid yellow quilt binding. The border print will double as backing, with a strip made up of two of the quilted rows running about two-thirds of the way down the backing.
What I learned today is that not only can simple things (like a border) really make a huge difference in a project, but also that if you ask questions, share your work, and seek out people who will help you, then you will learn things that you wouldn't have picked up on your own. And shopping in that little quilting shop means that I'm paying more for what I'm purchasing, but I'm also getting expert advice and encouragement that I can't get from a chain store. The ladies in the chain stores are definitely nice, but today, I had an owner and an additional quilter in the shop who devoted an hour just to showing me the ropes, explaining different ways to do what I was doing, and helping me select fabric for this and other projects. I would say that the small difference in price is definitely made up for by the quality of the fabric I was able to buy, but more importantly, in the one-on-one attention that I received.
April 5, 2010
Okay, so enough is enough...
Having been without my sewing machine for two and a half weeks now, I have determined that it is time to buy a new machine that is capable not only of basic sewing, but also will have the capacity to do the free-motion quilting that I'm so excited to try. My White 1740, assuming it will eventually be back in working order, will become my back-up machine. It is great for traveling and would be easy to take back and forth to sewing classes, so I won't give up on it completely. But I have way too many projects waiting to be completed to keep waiting, and hey, if I'm going to do any of my own quilting, which I really want to do, then this purchase is imminent.


Hopefully, I will be able to find the perfect machine for me. I'm going over to the sewing shop later today and will post my results. In the meantime, here are the pictures I promised of the circles and squares that will make up the circle quilt. Don't ask me what on earth Evelyn is doing with her hands -- she made that same pose in every single pic.

Wait a minute... I just figured it out. She is clearly hoping to be the next Vanna White. Check out those hands. And she already knows her letters, so I think she is a shoe-in, don't you?

Let's not leave out my boy, Gunnar. He has had so much fun since figuring out that shoes are not his mortal enemy, after all. Check him out.


One more. I just can't help myself.
He swiped Grandma's water cup. I think he was so thrilled to have grabbed it that it didn't matter to him that he couldn't get anything out of the straw. He took off running and giggling after snagging this cup.


I'll sign off for now. Wish me sewing machine shopping luck. I sure hope I'll be posting a picture of my new machine soon! Seriously, I am trying not to get my hopes up that I'll find anything, but oh, can you imagine if they actually have a machine in the shop that is reasonably priced AND does what I want?
March 31, 2010
Still ... no sewing machine
I guess this is supposed to be one of those lessons in patience that I hate so much. Ugh. My sewing machine is still in the repair shop. It's funny that it took me so long to get up the courage to open up that sewing machine and get going with it, even with Mom's help, and then as soon as I discovered how much I enjoyed sewing and making things, the machine died and has been out of commission for almost two weeks.
Just for kicks, I will show you the fabrics that I chose for the circles. My quilt will be 8 blocks by 8 blocks, so I had to find eight patterns with colors that coordinated. That was a lot harder than I expected, by the way!
Here we go...


However, I am still making progress towards my first quilt. Having chosen THIS circle quilt pattern, I purchased the fabrics for the circles, ironed on all the interfacing, traced my circles with a 5 inch template, and cut them all out two night ago. Tonight, I started cutting the squares that will be that background pieces for the circles. Maybe my machine will be ready by the weekend, and I can have some fun stitching up my blocks and seeing how far I get with the rows. I have a lot of excitement and anticipation built up for this project, so it would be nice to see it start coming together in more of a tangible way.
Just for kicks, I will show you the fabrics that I chose for the circles. My quilt will be 8 blocks by 8 blocks, so I had to find eight patterns with colors that coordinated. That was a lot harder than I expected, by the way!
Here we go...


The backing fabric is a cute dot print too, but I'll show that one later. Tomorrow I'll post pictures of the circles and squares --- I'm sure you'll be waiting on pins and needles, right?
March 23, 2010
Mommy & Daughter are Both Crafty
Okay, so don't think that it will be normal for there to be more than one post per day, but I have some super cute pics to share. While Erick was on set this evening, I took the kids to Michael's Craft Store. We bought a sand art kit for Evelyn, and I picked up the rest of the supplies I needed for a pincushion project. Gunnar didn't get to do any crafts, but rest assured that he had a blast riding in the buggy all over Michael's getting to flirt with every female in the entire store. I swear, I have no idea how he knows how to flirt, but watch out... he will flutter those long lashes, show those twinkly blue eyes, and flash that adorable smile, and every woman in a 10 mile radius goes to total mush.
Evelyn agreed to pose with her sand art collection, but insisted that Pink Bear and Strawberry Shortcake (blanket) got to pose with her. Here are her pics.


Now before I reveal my pin cushion extraordinaire, let me point you to this TUTORIAL that I found a couple of nights ago.
Here is my first attempt at a cake pincushion. I decided to use colors to match my craft closet, which worked out really well.

Here is a view from the top, which shows the flower detail. The pins are cute pearlized pins that I hope will be an inspiration for my continued sewing projects.

That's all for tonight. I did get the new part put on the dishwasher, but haven't quite gotten up the nerve to actually run a load of dishes. Yall say a few prayers, okay???
Goodnight!
Evelyn agreed to pose with her sand art collection, but insisted that Pink Bear and Strawberry Shortcake (blanket) got to pose with her. Here are her pics.

And now a sweet smile...

Now before I reveal my pin cushion extraordinaire, let me point you to this TUTORIAL that I found a couple of nights ago.
Here is my first attempt at a cake pincushion. I decided to use colors to match my craft closet, which worked out really well.

Here is a view from the top, which shows the flower detail. The pins are cute pearlized pins that I hope will be an inspiration for my continued sewing projects.

That's all for tonight. I did get the new part put on the dishwasher, but haven't quite gotten up the nerve to actually run a load of dishes. Yall say a few prayers, okay???
Goodnight!
March 12, 2010
Recent Craftiness
Okay, so this will be sort of a conglomeration of recently finished projects, but I wanted to try posting some pictures and here is my excuse to do that.

And here is a close-up shot showing the chain stitch detail. This is definitely one of my favorite things I've ever knitted. The longer I worked on it, the more nervous I got about giving it to my friend. I wanted her to love it -- I wanted to be proud and happy when I gave it to her. It had to be just right. And when she saw it, the look on her face made it all worth while. She was happy, and I was thrilled to have been able to make something that her sweet little one can treasure for a long, long time.

I have finally gotten up the nerve (along with my Mom's help) to try using the sewing machine that a friend gave me a few years ago. I've been so nervous about threading it that I just kept putting off trying. (How crazy is that???) Having fallen in love with craft blogs and sewing tutorials, I decided it was time. So I made a couple of scarves (okay, so I made four scarves) using THIS pattern. That gave me the courage to try something else.
)
)
)
)
)
First up, is a blanket that I knitted for a friend's baby daughter. The pattern came from Ravelry, and we chose the colors to match the linens in the baby's nursery. I had the yarn and kept looking at different patterns, even starting a couple of other patterns, before settling on this chain-stripe pattern. I loved the completed blanket, and I think it's safe to say that my friend liked it too. Here is the blanket...
First a shot of the whole blanket.
First a shot of the whole blanket.

And here is a close-up shot showing the chain stitch detail. This is definitely one of my favorite things I've ever knitted. The longer I worked on it, the more nervous I got about giving it to my friend. I wanted her to love it -- I wanted to be proud and happy when I gave it to her. It had to be just right. And when she saw it, the look on her face made it all worth while. She was happy, and I was thrilled to have been able to make something that her sweet little one can treasure for a long, long time.

I have finally gotten up the nerve (along with my Mom's help) to try using the sewing machine that a friend gave me a few years ago. I've been so nervous about threading it that I just kept putting off trying. (How crazy is that???) Having fallen in love with craft blogs and sewing tutorials, I decided it was time. So I made a couple of scarves (okay, so I made four scarves) using THIS pattern. That gave me the courage to try something else.
Here are my cloth napkins, which I made using a TUTORIAL from Chez Beeper Bebe.
Here is another picture, showing all the prints that I have made so far.
Pretty cool, huh?
Okay, and now my most ambitious project to date, which I made from start to finish yesterday during Gunnar's LONG nap. It is from this TUTORIAL from the blog, From An Igloo. It's an art bag to hold crayons (I love these Crayola Twister's Crayons, by the way) and a coloring book and/or notebook. Can you believe that I actually MADE this all by myself???
Here is a picture of the outside cover.
Now for the inside, which is absolutely brilliant. No lost crayons on my watch!
And, finally, a picture of the proud recipient.
Okay, that's all for now. I'll get the blanket picture uploaded, so that I can post it too.
Subscribe to:
Posts (Atom)